It was 11:30 PM on a Saturday, and the house was quiet in that specific, heavy way it only gets after guests have left. I was standing in my kitchen, staring at the empty platter on the coffee table. It was just a few crumbs. Not even a decent amount of crumbs. Just a sad, dusty residue where a massive, golden, gooey loaf of bread had been thirty minutes earlier.
My husband walked in, saw the empty plate, and let out a low whistle. “You know,” he said, “I think half the people who came over are already texting me asking for the recipe. They’re not asking about the wine. They’re not asking about the playlist. They’re asking about the bread.”
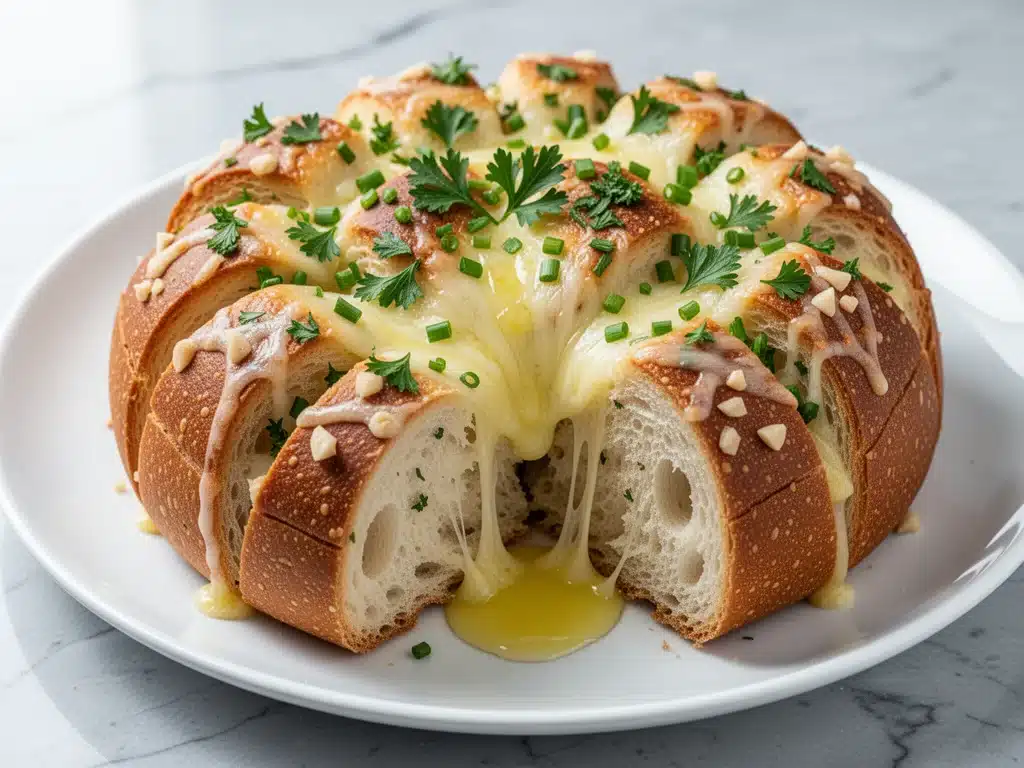
That’s when I realized I had stumbled onto something. It wasn’t just a snack. It was a crowd-pleaser. A showstopper. It was the cheesy garlic pull-apart bread everyone always asks for.
I’ve made this loaf at least fifty times over the last three years. I’ve made it for Super Bowl parties, for birthday dinners, for last-minute potlucks, and even as a midnight snack for just my husband and me. And every single time, the reaction is the same. People stop mid-conversation. They stare at the garlic butter dripping down their fingers. They ask, “How did you make this?”
Here’s the truth: It’s not magic. It’s not even that hard. But it feels like magic because of the smell. You walk into a room and everyone knows where the good food is. This cheesy garlic pull-apart bread is my secret weapon for any gathering. It’s buttery, garlicky, cheesy, and infinitely customizable. If you’ve ever been intimidated by baking bread from scratch, don’t worry. You’re not making bread in the traditional sense. You’re making a savory, cheesy masterpiece that comes together in about an hour. Let me show you how to make the loaf that steals the show.
Why You’ll Love This Cheesy Garlic Pull-Apart Bread
Look, I’m not going to stand here and tell you this is a health food. It’s butter and cheese. It’s glorious. But there are specific reasons this cheesy garlic pull-apart bread everyone always asks for has earned a permanent spot in my rotation.
- Zero Bread-Baking Stress — You don’t need a stand mixer. You don’t need to proof yeast for an hour. You don’t need to knead dough until your arms ache. You’re using a store-bought loaf (or a simple homemade one) and transforming it. It’s basically cooking hack level: expert.
- The “Wow” Factor — Visually, this thing is stunning. When you pull a piece away and that long, dramatic cheese stretch happens, people actually gasp. It looks like you spent hours in the kitchen. Spoiler: You didn’t.
- Flavor Bomb — Most bread dips are just salt and butter. This is loaded with fresh garlic, parmesan, mozzarella, and a hint of parsley. Every bite is packed with savory flavor. It’s not just a side; it’s the main event for appetizers.
- Feeds a Crowd Easily — One loaf makes 12-16 pieces. That’s perfect for a party of 10 with leftovers, or a family of 4 for two meals. It stretches further than you think because it’s so rich.
- Make-Ahead Friendly — This is the game-changer. You can assemble this the night before, put it in the fridge, and pop it in the oven when you get home. No last-minute panic. Just pull it out, bake, and serve.
This is the recipe I reach for when I need to impress without sweating. It’s reliable, it’s delicious, and it’s always a hit.
Ingredients You’ll Need
Before we get to the fun part, let’s talk about what you need. I’m keeping this list short because, honestly, the fewer ingredients, the better. But quality matters here. Since there aren’t many components, each one needs to do heavy lifting.
For the Bread Base
French Baguette or Italian Loaf (1 large, about 14-16 inches) — This is your foundation. I prefer a long baguette because it’s easier to slice into even sections. A round Italian loaf works too, but you’ll have to work around the shape. Avoid soft, squishy sandwich bread; you need a crust that can hold up to the butter without getting soggy immediately.
For the Garlic Butter

Unsalted Butter (1 stick / 113g) — Softened to room temperature. This is crucial. If your butter is cold, you can’t mix it smoothly with the garlic. If it’s melted, it won’t coat the bread right. Softened is the sweet spot.
Garlic (6-8 cloves, minced) — Yes, that many. I know it sounds like a lot, but this is cheesy garlic pull-apart bread everyone always asks for. The garlic is the star. Use fresh garlic. Please, I beg you, do not use jarred garlic. Jarred garlic has a sulfurous, metallic taste that ruins the delicate butter. Freshly minced garlic smells amazing and tastes sweet when baked.
Dried Parsley (2 teaspoons) — For that pop of green color and a hint of herbal freshness. If you have fresh parsley, chop it finely and use 1 tablespoon. Fresh is better, but dried works in a pinch.
Garlic Powder (1 teaspoon) — This adds a different layer of flavor than the fresh garlic. It gives a deeper, more toasted garlic note. It’s optional, but I highly recommend it for extra punch.
For the Cheese Blend
Shredded Mozzarella (2 cups / 200g) — The stretchy cheese. The glue. Buy a block and shred it yourself. Pre-shredded mozzarella is coated in cellulose (wood pulp, essentially) to prevent clumping, and that coating stops it from melting properly. Your cheese will be stringy and clumpy if you use the bag stuff. It’s worth the two minutes to shred your own.
Grated Parmesan (½ cup / 50g) — This is the salty, savory depth. It melts into the butter and creates a crusty, flavorful layer. Again, grate from a block. The pre-grated stuff doesn’t melt the same way.
Cheddar (Optional) (½ cup / 50g) — I sometimes swap half the mozzarella for sharp cheddar if I want a tangier flavor. It’s not traditional, but it’s delicious. Stick to mozzarella and parmesan for the classic version.
For the Finish
Flaky Sea Salt — A light sprinkle on top right after baking. It elevates the flavor instantly.
Extra Parsley — For garnish.
Equipment Needed
You don’t need anything fancy for this. Here’s what I actually use in my kitchen.
Baking Sheet — A standard 13×9 or half-sheet pan. Line it with parchment paper for easy cleanup. Grease is optional if you use parchment.
Sharp Serrated Knife — This is the most important tool. You need a knife that can slice through the crust of the baguette without crushing the soft interior. A dull knife will squish the bread. A sharp serrated knife glides through like butter.
Small Bowl — For mixing the garlic butter.
Pastry Brush — Optional, but helpful for getting butter into the nooks and crannies. I usually just use a spoon.
Aluminum Foil — To cover the bread for the first part of baking, preventing the top from burning before the cheese melts.
How to Make It: Step-by-Step
Alright, let’s make this! I’m walking you through exactly how I do it, including the little tricks I’ve picked up so your cheesy garlic pull-apart bread everyone always asks for comes out perfect every time.
Step 1: Prep Your Oven and Pan (5 minutes)
Preheat your oven to 375°F (190°C). Line a large baking sheet with parchment paper. I like to leave a little space around the edges so the bread doesn’t touch the sides of the pan. This allows heat to circulate and ensures even browning.
Step 2: Slice the Bread (5 minutes)
Take your baguette or Italian loaf. You want to slice it horizontally, but not all the way through. Imagine you’re opening a book. Slice along the length of the loaf, creating a hinge at the bottom. Then, slice vertically at 1-inch intervals, but stop before you cut through the bottom hinge. You should end up with a grid of bread squares that are connected at the bottom. This is what allows you to “pull apart” the pieces later. If you cut all the way through, you’ll just have bread slices, and the cheese will fall out.
Pro Tip: If you’re nervous about cutting too deep, place a few chopsticks or wooden spoons on either side of the loaf to act as guides. The knife will hit the chopsticks and stop, ensuring you don’t cut through the bottom.
Step 3: Make the Garlic Butter (3 minutes)
In a small bowl, combine the softened unsalted butter, minced fresh garlic, dried parsley, and garlic powder. Mix it until it’s a smooth, fragrant paste. The smell should be incredible right now. If your kitchen doesn’t smell like a garlic restaurant, you need more garlic.
Step 4: Stuff the Bread (10 minutes)
This is the fun part. Using your fingers or a small spoon, gently pry open each square of bread. Spread a generous amount of the garlic butter into every nook and cranny. Get it between the slices. Then, sprinkle the shredded mozzarella and grated parmesan generously over the top and into the gaps. Don’t be shy with the cheese. You want every piece to be loaded.
Personal Note: I usually save a little bit of the cheese mixture to sprinkle on top at the very end. This creates a nice, cheesy crust.
Step 5: First Bake (15 minutes)
Place the stuffed loaf on your prepared baking sheet. Cover it loosely with aluminum foil. This is important. The foil traps the steam and helps the bread warm through and the cheese melt without burning the top. Bake for 15 minutes.
Step 6: Second Bake (10 minutes)
Remove the foil. Now you want to let that cheese get golden and bubbly. Bake for another 10 minutes, or until the cheese is melted, bubbly, and starting to brown in spots. Keep an eye on it. Ovens vary. You want it to look like a golden, cheesy landscape.
Step 7: Cool and Serve (5 minutes)
Take it out of the oven. Sprinkle with flaky sea salt and a little extra fresh parsley if you have it. Let it cool for 5 minutes. This allows the cheese to set slightly so it doesn’t slide off when you pull a piece away. Then, serve warm. Pull apart, dip, devour.
Expert Tips & Tricks
Here’s everything I’ve learned from making this dozens of times. These tips will save you from my mistakes.
Don’t Skip the Chopstick Trick — I learned this from a friend who burned her fingers trying to judge depth with a knife. The chopsticks are a lifesaver for even slicing.
Butter Temperature is Key — If your butter is too cold, you’ll tear the bread when trying to spread it. If it’s too warm, it will soak into the bread and make it soggy. Room temperature, soft but holding its shape, is perfect.
Shred Your Own Cheese — I cannot stress this enough. Pre-shredded cheese has anti-caking agents that prevent smooth melting. Your cheesy garlic pull-apart bread everyone always asks for will look and taste so much better with freshly shredded mozzarella.
Use Fresh Garlic — Jarred garlic is a no-go. It has a vinegar brine and a metallic taste. Fresh garlic, minced fine, blends into the butter and creates a sweet, aromatic flavor when baked.
Let It Rest — I know, I know. It smells amazing and you want to eat it now. But letting it rest for 5 minutes after baking helps the cheese set. If you pull it apart immediately, the cheese might slide off. A short rest makes the pulling experience much more satisfying.
Variations & Substitutions
Once you’ve nailed the basic version, here’s how you can mix it up. I’ve tried all of these, and they’re all winners.
Jalapeño Popper Bread — Add ½ cup diced jalapeños (fresh or pickled) and ½ cup cream cheese (softened) to the garlic butter. Top with cheddar instead of mozzarella. Spicy, creamy, and addictive.
Spinach and Artichoke Bread — Mix 1 cup thawed, squeezed-dry spinach and ½ cup chopped artichoke hearts into the cheese blend. Add a little cream cheese to the butter. It tastes like the dip, but in bread form.
Steak and Blue Cheese — Add 1 cup cooked, diced steak and ½ cup crumbled blue cheese. Top with cheddar. This is for the bold flavors.
Vegan Version — Use vegan butter, nutritional yeast instead of parmesan, and vegan shredded mozzarella. It’s not exactly the same, but it’s surprisingly good. My vegan friends love this version.
Gluten-Free — Use a gluten-free baguette. Note that GF bread is often softer and can get soggy faster. Use less butter and serve immediately.
Serving & Storage
How to Serve: I usually serve this straight from the baking sheet. It looks rustic and stays warm. Put it on the table and let people pull pieces as they come in. Pair it with a simple marinara sauce for dipping, or just enjoy it as is.
Side Dishes: This is perfect with soup, salad, or as an appetizer before a main course. It pairs well with tomato soup, chili, or a light arugula salad.
Storage: Store leftovers in an airtight container in the fridge for up to 3 days. The bread will stale, but it’s still good.
Reheating: Reheat in the oven at 350°F for 10-15 minutes, covered with foil, until warmed through. This restores the softness. Microwave reheating makes the bread chewy and tough, so avoid it if you can.
Freezing: You can freeze the assembled, unbaked loaf. Wrap it tightly in plastic wrap and then foil. Bake from frozen, adding 10-15 minutes to the baking time. This is great for meal prep!
Nutrition Information
I’m not a nutritionist, but here’s the breakdown if you’re tracking. Keep in mind that this is a rich, buttery bread, so portion control is key.
Per Serving (based on 12 pieces):
- Calories: 280
- Protein: 10g
- Carbs: 28g
- Fat: 16g
- Fiber: 1g
My Take: This is comfort food. It’s not a diet recipe. But it’s way better than store-bought garlic bread, and you know exactly what’s in it. When I make this, I enjoy a few pieces and pair it with a big salad to balance it out. It’s all about moderation and enjoyment.
Final Thoughts
So that’s my go-to cheesy garlic pull-apart bread everyone always asks for! I’ve probably talked your ear off at this point, but when you make a recipe this often, you have a lot to say about it.
This loaf has saved me more times than I can count. It’s my answer to “What can I bring to the party?” when I’m short on time. It’s my go-to when I want to feel fancy but don’t want to spend hours cooking. My family is obsessed, my friends are obsessed, and I hope you will be too.
Make it yours! Try different cheeses, add some bacon bits, or throw in some herbs. The best recipes are the ones you adapt to your tastes. If you make this, drop a comment and let me know what you think! I love hearing how recipes turn out in your kitchen.
Happy cooking! And I hope your kitchen smells half as good as mine does right now.
Frequently Asked Questions
Can I use a different type of bread?
Absolutely! While a baguette is traditional because of its shape, you can use an Italian loaf, a ciabatta, or even a round sourdough. Just adjust your slicing technique accordingly. For a round loaf, slice it horizontally and then vertically, like a web. The key is to keep the bottom connected so the cheese doesn’t fall out.
Can I make this ahead of time?
Yes! This is one of the best things about it. Assemble the bread completely, cover it tightly with plastic wrap, and refrigerate for up to 24 hours. When you’re ready to bake, take it out of the fridge and let it sit for 20 minutes while the oven preheats. Then bake as directed. You might need to add 5 minutes to the baking time since it’s starting cold.
Why did my bread get soggy?
Sogginess usually happens if the butter is too liquid or if the bread is too soft. Make sure your butter is softened, not melted. Also, use a crusty bread like a baguette. Soft sandwich bread will absorb the butter and turn into mush. If you’re using a softer loaf, reduce the amount of butter slightly.
Can I freeze this?
You can freeze the assembled, unbaked loaf. Wrap it tightly in plastic wrap and then foil. Bake from frozen, adding 10-15 minutes to the baking time. Cooked leftovers can be frozen, but the texture of the bread will suffer upon reheating. It’s best to freeze it before baking for the best results.
Can I use pre-minced garlic?
I strongly advise against it. Pre-minced garlic in jars often contains preservatives and vinegar that alter the flavor. It can taste metallic or sour. Fresh garlic, minced fine, blends seamlessly into the butter and creates a sweet, aromatic flavor when baked. It’s worth the extra minute to mince your own.
What can I serve with this?
This bread is versatile. It pairs well with marinara sauce for dipping, or it can be served alongside tomato soup, chili, or a light green salad. It’s also great as a standalone appetizer with a variety of dips like ranch, guacamole, or hummus.
Pin This Recipe!


Cheesy Garlic Pull-Apart Bread: Easy 1-Hour Recipe
- Total Time: 45 minutes
- Yield: 12-16 servings 1x
Description
A crowd-pleasing, savory loaf made with a store-bought baguette, stuffed with a rich garlic butter mixture and loaded with mozzarella and parmesan cheese. It bakes to golden perfection in about an hour.
Ingredients
- 1 large French Baguette or Italian Loaf (14–16 inches)
- 1 stick (113g) Unsalted Butter, softened to room temperature
- 6–8 cloves Garlic, minced fresh
- 2 teaspoons Dried Parsley (or 1 tablespoon fresh, chopped)
- 1 teaspoon Garlic Powder
- 2 cups Shredded Mozzarella Cheese (freshly shredded)
- ½ cup Grated Parmesan Cheese (freshly grated)
- ½ cup Cheddar Cheese, shredded (optional)
- Flaky Sea Salt, for finishing
- Extra Parsley, for garnish
Instructions
- Preheat oven to 375°F (190°C). Line a large baking sheet with parchment paper.
- Slice the baguette horizontally, leaving a hinge at the bottom so it opens like a book. Then slice vertically at 1-inch intervals, stopping before cutting through the bottom hinge to create a connected grid.
- In a small bowl, mix the softened butter, minced garlic, dried parsley, and garlic powder until smooth.
- Gently pry open each square of bread and spread the garlic butter mixture into all nooks and crannies.
- Sprinkle the mozzarella and parmesan cheese generously over the top and into the gaps between the bread slices.
- Cover the loaf loosely with aluminum foil and bake for 15 minutes.
- Remove the foil and bake for another 10 minutes, or until the cheese is melted, bubbly, and golden brown.
- Remove from oven, sprinkle with flaky sea salt and extra parsley. Let cool for 5 minutes before serving to allow cheese to set.
Notes
Use fresh garlic instead of jarred for better flavor. Shred your own cheese to ensure smooth melting. Use the chopstick trick when slicing to avoid cutting all the way through the bottom. Let the bread rest for 5 minutes after baking to prevent cheese from sliding off.
- Prep Time: 20 minutes
- Cook Time: 25 minutes
- Category: Appetizer
- Cuisine: American
Nutrition
- Serving Size: 1 piece
- Calories: 280
- Sugar: 2
- Sodium: 450
- Fat: 16
- Saturated Fat: 8
- Carbohydrates: 28
- Fiber: 1
- Protein: 10
Keywords: cheesy garlic pull-apart bread, garlic bread, party appetizer, easy bread recipe, pull-apart bread, cheesy bread, crowd pleaser