I have a confession to make. For years, I was that person who bought the expensive, fancy crackers at the grocery store. You know the ones—the ones in the tin, or the ones with the rustic-looking packaging that cost nearly six dollars for a box of twelve crackers. I told myself I was investing in quality. I told myself it was worth it for that “artisanal” crunch.
Then, last month, I was hosting a small dinner party for some friends who are serious about cheese. I pulled out a board with a sharp aged cheddar, some honeycomb, and those fancy crackers. One of my friends picked up a cracker, took a bite, and immediately frowned. “This tastes like cardboard,” she said, not unkindly. “It’s stale.”
It stung. Because she was right. They weren’t stale in the traditional sense, but they lacked soul. They lacked the sharp, tangy punch that real cheddar should have. They were dry, bland, and completely forgettable. I looked at that cracker like it was a betrayal.
That night, instead of ordering takeout, I decided to make my own homemade cheddar cheese crackers with sea salt. I didn’t have a fancy pastry cutter or a marble slab. I just had a rolling pin, a bowl, and a block of sharp cheddar that needed to be used up. I expected a disaster. I expected a greasy mess that wouldn’t hold together.
Instead, I got something magical.
These crackers are crispy, golden, and packed with enough cheese flavor that you don’t need any toppings. They have that perfect shatter when you bite them, followed by a rich, savory melt. I ate three of them straight out of the oven before they were even cool. My husband walked in, asked what smelled so good, and ate half the batch before I could plate any. That is when I knew: I never needed to buy crackers again.
It’s been six months, and I’ve made this homemade cheddar cheese crackers with sea salt recipe at least ten times. It’s my go-to for game day, for afternoon snacks, and for impressing guests who think they know better than me. (Spoiler: They don’t, not when they taste these.)
Why You’ll Love This Recipe
There are about five reasons I keep making these, but here are the big ones that will change your snack game forever.
Stupid Simple — Seriously, if you can mix butter and flour, you can make this. There’s no kneading, no rising, and no waiting. I’ve walked my teenage son through it over FaceTime while he was at college. He made them in his dorm kitchen using a microwave-safe bowl and a plate. It works.
Lightning Fast — 20 minutes from start to finish, and only 10 of those are active. I make these on weeknights when I get home at 7pm and need a snack that feels gourmet but doesn’t require a 45-minute cook time. The oven does the heavy lifting.
Pantry-Friendly — You probably have 80% of these ingredients already. Flour, butter, cheese, salt, ice water. I keep sharp cheddar stocked specifically so I can throw these together on a whim. It’s the ultimate “I need to use this cheese before it goes bad” recipe.
Crowd-Pleaser — I’ve served these to my vegetarian sister, my gluten-free neighbor (with a simple swap), and my dad who usually complains about everything. Everyone loved them. Even the dog watched me closely, but he didn’t get any. Sorry, Buster.
Makes Amazing Leftovers — Actually, they don’t even have leftovers. But if they do, they stay crispy for days if stored correctly. I deliberately make extra for lunch throughout the week, paired with a sharp cheddar dip or just on its own.
Budget-Smart — Feeds 4-6 people for under $5. That’s less than one box of those fancy store-bought crackers. You’re saving money and getting way better flavor.
This is my go-to when I need a snack to just work. No complicated techniques, no weird ingredients, just reliable, delicious food that makes everyone happy. And honestly? It pairs beautifully with other warm comfort foods. If you’re making a spread, these hold their own next to something hearty like cheesy garlic pull apart bread or even as a side to a rich braised short ribs meal.
Ingredients You’ll Need
Here’s the best part: you probably have most of this already. This isn’t a recipe that requires a trip to a specialty store. It’s built on basics, but the quality of those basics matters.
For the Dough
Unsalted butter (½ cup / 113g, cold and cubed) — This is non-negotiable. Cold butter creates flakes. If your butter is soft, your crackers will be tough. Cube it and put it back in the fridge for 10 minutes before you start. I use European-style butter when I can find it because of the higher fat content, but regular salted butter works if you reduce the added salt.
All-purpose flour (1 ½ cups / 190g) — Standard flour is fine. I use Gold Medal. Cake flour makes them too tender; bread flour makes them too chewy. You want that crisp snap.
Sharp cheddar cheese (1 cup / 100g, freshly grated) — This is the star. Do not use pre-shredded cheese. It has potato starch that prevents it from melting properly and can make the dough gritty. Buy a block of sharp cheddar and grate it yourself. “Sharp” is key here—mild cheddar won’t have enough punch. Extra sharp is even better if you like intense flavor.
Ice water (2-4 tablespoons) — This binds the dough. The colder the water, the better. Fill a glass with water and ice, let it sit for a minute, then scoop out the water. This keeps the butter cold while mixing.
Garlic powder (½ teaspoon) — Optional, but I love it. It adds a savory depth that complements the cheese. If you’re sensitive to garlic, skip it, but I think it’s worth it.
Dijon mustard (1 teaspoon) — This seems weird, but it doesn’t make them taste like mustard. It adds acidity and helps emulsify the fat, giving you a better texture. It’s a secret weapon.
Kosher salt (½ teaspoon, plus more for sprinkling) — Use kosher salt for the dough so you can control the salinity. Table salt is too dense and can make the crackers too salty.
For the Topping
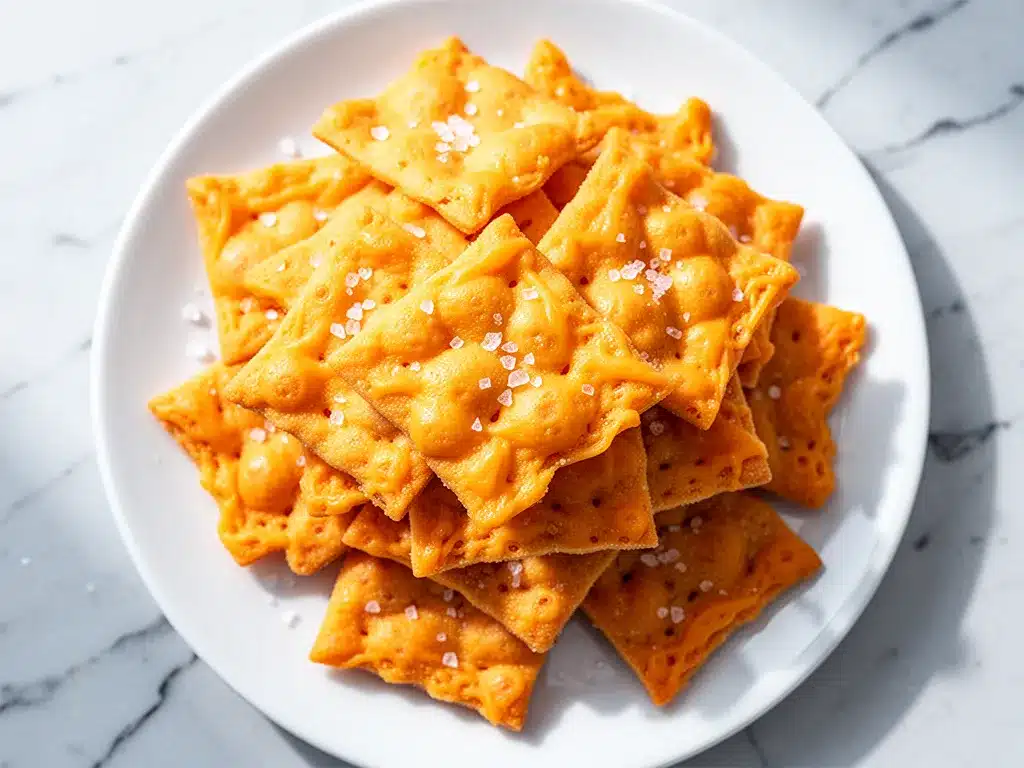
Coarse sea salt (for sprinkling) — This is what makes them look fancy and taste incredible. The big crystals provide a satisfying crunch and bursts of saltiness. Flaky sea salt like Maldon is best, but any coarse sea salt works.
Equipment Needed
You don’t need fancy equipment for this. Here’s what I actually use.
Food processor — I use this because it’s fast and keeps the butter cold. You pulse the flour and cheese together, then add the butter. It takes 30 seconds. If you don’t have one, a pastry cutter works, but it takes more arm strength.
Rolling pin — A standard wooden rolling pin is perfect. I prefer a straight pin over a French pin because it’s easier to control thickness.
Baking sheet — A standard 13×18 inch sheet. I line it with parchment paper for easy cleanup. I’ve tried silicone mats, but parchment gives me a better crisp on the bottom.
Pizza cutter or sharp knife — To cut the crackers into squares or triangles. A pizza cutter is way easier than a knife because it doesn’t drag the dough.
Fork — To prick the dough before baking. This prevents puffing.
Grater — Box grater or microplane. I use the medium side of a box grater. If you buy pre-shredded cheese, you’ll regret it. I promise.
Pastry brush — Optional, but nice if you want to brush the tops with a little egg wash for extra golden color. I usually skip this and just rely on the butter in the dough.
How to Make It: Step-by-Step
Alright, let’s make this! I’m walking you through exactly how I do it, including the little tricks I’ve picked up. This process is forgiving, but precision with temperature is key.
Step 1: Prep Your Cheese and Butter (5 minutes)
Before you start, make sure your butter is ice-cold. Cube it into small ½-inch pieces. If it’s warm, put it in the freezer for 10 minutes. Grate your cheddar cheese. If you’re using a block, grate it into fine shreds. If the shreds are too big, they won’t distribute evenly. Set both aside.
Step 2: Pulse the Dry Ingredients (1 minute)
Place your flour, grated cheddar, garlic powder, and ½ teaspoon of salt into the bowl of a food processor. Pulse about 5-6 times until the mixture looks like coarse sand. The cheese should be evenly distributed throughout the flour. Don’t over-pulse, or you’ll start heating the mixture.
Step 3: Add the Butter (1-2 minutes)
Add the cold cubed butter to the food processor. Pulse 10-15 times. You want the mixture to look like coarse crumbs with some pea-sized bits of butter remaining. Those butter bits are what create the flaky layers. If it looks like a solid ball, you’ve over-mixed. If it looks like oil, your butter was too warm. Aim for visible chunks.
Step 4: Add the Liquid (1 minute)
With the processor running, slowly drizzle in the ice water and Dijon mustard through the feed tube. Stop as soon as the dough starts to clump together. You might not need all 4 tablespoons. Start with 2, check the texture, and add more only if it’s too dry. The dough should hold together when you pinch it, but it shouldn’t be wet or sticky.
Step 5: Form the Dough (2 minutes)
Turn the dough out onto a piece of plastic wrap. Gently press it together into a disk. Don’t overwork it. If it’s crumbly, press it firmly. Wrap it tightly and refrigerate for at least 30 minutes. This step is crucial. It relaxes the gluten and re-chills the butter. If you skip this, your crackers will shrink in the oven.
Step 6: Roll and Cut (5 minutes)
Preheat your oven to 375°F (190°C). Line a baking sheet with parchment paper. Take the dough out of the fridge and roll it out on a lightly floured surface. Aim for about ⅛ inch thick. Thicker crackers will be bread-like; thinner crackers will be crispier. I like them thin. Use a pizza cutter to cut them into squares or triangles. Transfer them to the baking sheet, leaving a little space between each.
Step 7: Prick and Season (2 minutes)
Use a fork to prick each cracker several times. This stops them from puffing up into balloons. Sprinkle generously with coarse sea salt. The salt sticks better if the dough is slightly tacky, but if it’s too dry, mist it lightly with water first. Don’t be shy with the salt—that’s half the flavor.
Step 8: Bake (12-15 minutes)
Bake for 12-15 minutes, rotating the pan halfway through. You want them golden brown around the edges. They might look slightly soft when you take them out, but they will crisp up as they cool. Let them cool on the pan for 5 minutes, then transfer to a wire rack to cool completely. This is the hardest part—waiting for them to cool.
Expert Tips & Tricks
Here’s everything I’ve learned from making this dozens of times. These tips will save you from my mistakes.
Keep Everything Cold
This is the #1 tip. Warm butter = tough crackers. If your kitchen is hot, work quickly. If your dough starts to feel greasy, put it back in the fridge for 10 minutes. I learned this the hard way with a batch of greasy, flat crackers that tasted like fried dough. Not good.
Grate Your Own Cheese
Pre-shredded cheese contains cellulose to prevent clumping. Cellulose doesn’t melt. It stays in little white bits in your cracker. Freshly grated cheese melts into the dough, creating a uniform, cheesy flavor in every bite. It takes 3 minutes. Do it.
Roll Thin
Use a ruler or your finger as a guide. Aim for ⅛ inch. If you roll them too thick, they’ll be chewy. If you roll them too thin, they might burn. ⅛ inch is the sweet spot for that perfect snap.
Don’t Skip the Chill
Refrigerating the dough isn’t just a suggestion. It hydrates the flour and firms up the butter. If you bake it immediately, the butter melts too fast, and the crackers spread into one giant cheese pancake. Patience pays off.
Common Mistakes (and how to avoid them):
Mistake: Crackers are too soft. Fix: You didn’t bake them long enough, or they were too thick. Bake until golden, not just pale. Also, ensure your oven is fully preheated.
Mistake: Crackers shrank. Fix: You didn’t chill the dough, or you stretched the dough while rolling. Roll gently, and always chill before baking.
Mistake: Crackers are too salty. Fix: You used salted butter and added extra salt. Use unsalted butter and control the salt amount carefully.
Variations & Substitutions
Once you’ve nailed the basic version, here’s how you can mix it up. I’ve tried all of these.
Jalapeño Cheddar
Add 1 diced jalapeño (seeds removed for less heat) and a pinch of cayenne to the dough. This is my favorite for game day. It adds a kick that pairs well with cold beer.
Herb and Garlic
Swap the garlic powder for 1 tablespoon of fresh chopped chives and 1 teaspoon of dried thyme. These are lighter and great with soup. They remind me of the crackers served at fancy tea shops.
White Cheddar
Use white cheddar instead of yellow. It has a sharper, more complex flavor and looks beautiful on a cheese board. My friend Sarah swears by white cheddar for these.
Gluten-Free
Use a 1:1 gluten-free flour blend. The texture will be slightly more crumbly, but the flavor is still amazing. I’ve used Bob’s Red Mill and it works well. Add an extra tablespoon of ice water if the dough is too dry.
Buttermilk Version
Replace the ice water with cold buttermilk. This adds tang and tenderness. It’s closer to a biscuit texture, but still crisp. I like this version for breakfast with jam.
Dietary Modifications:
Vegan — Use vegan butter (like Miyoko’s) and vegan cheddar (like Violife). It’s harder to get the same melt, but it’s doable. You might need to add a little extra flour.
Dairy-Free — Skip the cheese and add 1 tablespoon of nutritional yeast for a cheesy flavor. It’s not the same, but it’s a decent workaround.
Serving & Storage
How to Serve:
I usually serve these straight out of the oven, warm and fragrant. But here are other ways I’ve enjoyed them:
- With Soup: They are perfect for dipping in tomato soup or a creamy broccoli cheddar soup. The crunch contrasts beautifully with the smooth soup.
- On a Charcuterie Board: Arrange them alongside cured meats, olives, and grapes. They’re neutral enough to let the other flavors shine.
- With Dip: Serve with a simple cream cheese and chive dip, or a spicy mustard dip. They’re also great with crispy air fryer mozzarella sticks if you’re doing a cheese-heavy appetizer spread.
- As a Snack: Just eat them plain. They’re addictive. I keep a tin of them on my desk for afternoon energy.
Storage Instructions:
Room Temperature: Store in an airtight container for up to 1 week. They stay crispy if kept dry. If your house is humid, they might soften after a few days. In that case, pop them in the oven at 300°F for 5 minutes to re-crisp.
Refrigerator: Not recommended. The moisture from the fridge will make them soggy. Only refrigerate if you’re using a filling that requires it, which these usually don’t.
Freezing: You can freeze unbaked dough disks for up to 3 months. Thaw in the fridge overnight before rolling and baking. You can also freeze baked crackers, but the texture might change slightly. I prefer to bake them fresh.
Nutrition Information
I’m not a nutritionist, but here’s the breakdown if you’re tracking.
Per Serving (based on 24 crackers):
- Calories: 110
- Protein: 3g
- Carbs: 8g
- Fiber: 0g
- Sugar: 0g
- Fat: 7g
- Saturated Fat: 4g
- Cholesterol: 15mg
- Sodium: 120mg
What’s Good:
- Low carb compared to bread
- Good source of calcium from the cheese
- No added sugar
What to Know:
- Higher in fat due to butter and cheese
- Contains dairy and gluten
- High sodium if you’re liberal with the salt topping
My Take:
Look, this is a snack with butter and cheese. It’s not a diet food. But it’s way better than processed crackers, and you control the ingredients. When I want to make it lighter, I use less butter and more cheese. But usually? I just eat a reasonable portion and enjoy it. It’s a treat, and that’s okay.
Final Thoughts
So that’s my go-to homemade cheddar cheese crackers with sea salt! I’ve probably talked your ear off at this point, but when you make a recipe this often, you have a lot to say about it.
This has saved my snack time more times than I can count. It’s my answer to “what’s for a snack” when I’m tired, don’t want chips, and still want something that tastes really good. My kids are happy, my husband’s happy, and I’m happy because I’m not stressed about cooking.
Make it yours! Try different cheeses, add herbs, or change the shape. The best recipes are the ones you adapt to your family’s tastes. And if you’re looking for something sweet to balance out the savory crackers, these chewy oatmeal raisin cookies are a perfect pairing for a tea time spread.
If you make this, drop a comment and let me know what you think! I love hearing how recipes turn out in your kitchen. And if something doesn’t work, tell me that too—I’m here to help troubleshoot.
Happy baking! And I hope your kitchen smells half as good as mine does right now.
Frequently Asked Questions
Can I use mild cheddar instead of sharp?
You can, but the flavor will be much milder. Sharp cheddar has a stronger, tangier taste that stands up to the butter and flour. If you only have mild cheddar, consider adding a little extra salt and maybe some garlic powder to boost the flavor. But for the best result, stick with sharp or extra sharp.
Why did my crackers spread in the oven?
This usually means the butter was too warm when you put them in the oven. The butter melted before the structure set, causing the crackers to spread. Make sure your butter is cold, and chill the dough for at least 30 minutes before rolling. Also, don’t stretch the dough while cutting; roll it gently and cut without pulling.
Can I make the dough ahead of time?
Yes! You can make the dough and refrigerate it for up to 3 days. Or, you can freeze the dough disks for up to 3 months. Just thaw in the fridge overnight before rolling and baking. This is great for meal prep. I often make the dough on Sunday and bake them throughout the week.
How do I store leftover crackers?
Store them in an airtight container at room temperature for up to 1 week. If they start to lose their crunch, pop them in the oven at 300°F for 5 minutes to re-crisp. Avoid refrigerating them, as the moisture will make them soft.
Can I use a stand mixer instead of a food processor?
You can, but be careful not to overmix. Use the paddle attachment on low speed. Add the butter last and mix just until the mixture resembles coarse crumbs. Overmixing will warm up the butter and develop the gluten, leading to tough crackers. The food processor is faster and safer for keeping things cold.
Why are my crackers soggy?
This could be a few things. First, make sure you’re rolling them thin. Thick crackers take longer to crisp up. Second, ensure your oven is fully preheated. A cold oven will steam the dough instead of baking it. Third, let them cool completely on a wire rack. If you stack them while they’re warm, the steam gets trapped and makes them soft.
Can I add other ingredients to the dough?
Absolutely! I’ve added diced jalapeños, chopped chives, or even a little cayenne pepper. Just make sure any wet ingredients (like fresh jalapeños) are patted dry first, so they don’t add too much moisture to the dough. Dry spices are the easiest to add.
Pin This Recipe!


Homemade Cheddar Cheese Crackers: 5 Easy Steps
- Total Time: 20 minutes
- Yield: 24 crackers 1x
Description
Crispy, golden homemade cheddar cheese crackers with sea salt that are ready in 20 minutes. Simple, budget-friendly, and packed with sharp cheddar flavor.
Ingredients
- 1 ½ cups (190g) all-purpose flour
- ½ cup (113g) unsalted butter, cold and cubed
- 1 cup (100g) sharp cheddar cheese, freshly grated
- 2–4 tablespoons ice water
- ½ teaspoon garlic powder
- 1 teaspoon Dijon mustard
- ½ teaspoon kosher salt (plus more for sprinkling)
- Coarse sea salt (for topping)
Instructions
- Cube the cold butter and grate the cheddar cheese. Set aside.
- In a food processor, pulse flour, grated cheddar, garlic powder, and ½ teaspoon salt until the mixture resembles coarse sand.
- Add the cold cubed butter and pulse 10-15 times until the mixture looks like coarse crumbs with pea-sized bits of butter remaining.
- With the processor running, slowly drizzle in ice water and Dijon mustard until the dough just begins to clump together.
- Turn dough out onto plastic wrap, press into a disk, wrap tightly, and refrigerate for at least 30 minutes.
- Preheat oven to 375°F (190°C) and line a baking sheet with parchment paper.
- Roll the chilled dough out on a lightly floured surface to about ⅛ inch thickness.
- Cut into squares or triangles using a pizza cutter and transfer to the baking sheet.
- Prick each cracker several times with a fork and sprinkle generously with coarse sea salt.
- Bake for 12-15 minutes, rotating halfway through, until golden brown around the edges.
- Cool on the pan for 5 minutes, then transfer to a wire rack to cool completely.
Notes
Keep all ingredients cold to ensure flaky, crispy crackers. Do not use pre-shredded cheese as it contains anti-caking agents that prevent proper melting. Chill the dough thoroughly before rolling to prevent shrinking. Store in an airtight container at room temperature for up to 1 week.
- Prep Time: 10 minutes
- Cook Time: 12-15 minutes
- Category: Snack
- Cuisine: American
Nutrition
- Serving Size: 1 cracker
- Calories: 110
- Sodium: 120
- Fat: 7
- Saturated Fat: 4
- Carbohydrates: 8
- Protein: 3
Keywords: homemade crackers, cheddar cheese crackers, sea salt crackers, easy snack, gluten-free option, budget-friendly recipe